Pawpaw Analytics
A platform for festival and event management — organize volunteers, track inventory, and carry your knowledge forward, year after year.
Welcome to Pawpaw Analytics
Whether you're running a music festival, a community clean-up series, or a recurring fundraiser, Pawpaw gives you the tools to organize volunteers, track inventory, and keep everything running smoothly — year after year.
This documentation walks you through the platform's core concepts and features. We'll explain not just how things work, but why we built them the way we did. Our goal is to help you feel confident setting up and managing your events, even if you've never used a platform like this before.
The Apps
Pawpaw Analytics hosts several purpose-built applications:
- Hands Up Volunteer — The heart of the platform. Hands Up manages volunteer signups, shift scheduling, registration forms, and communication for your events. If you're here to organize volunteers, this is where you'll spend most of your time.
- ItCounts — Inventory and point-of-sale tracking. ItCounts helps you manage products, track transactions, run audits, and integrate with Square or Clover. Perfect for events with concessions, merchandise, or any physical goods.
Each app plugs into the same organizational structure, so your events, dates, and team permissions carry across everything.
Need a hand while you work Once you're signed in, every page gets an Ask AI button in the top-right Help dropdown. It opens a slide-out panel where you can ask questions about the platform and get answers drawn straight from this documentation — no need to come back to the Help Center to look something up.
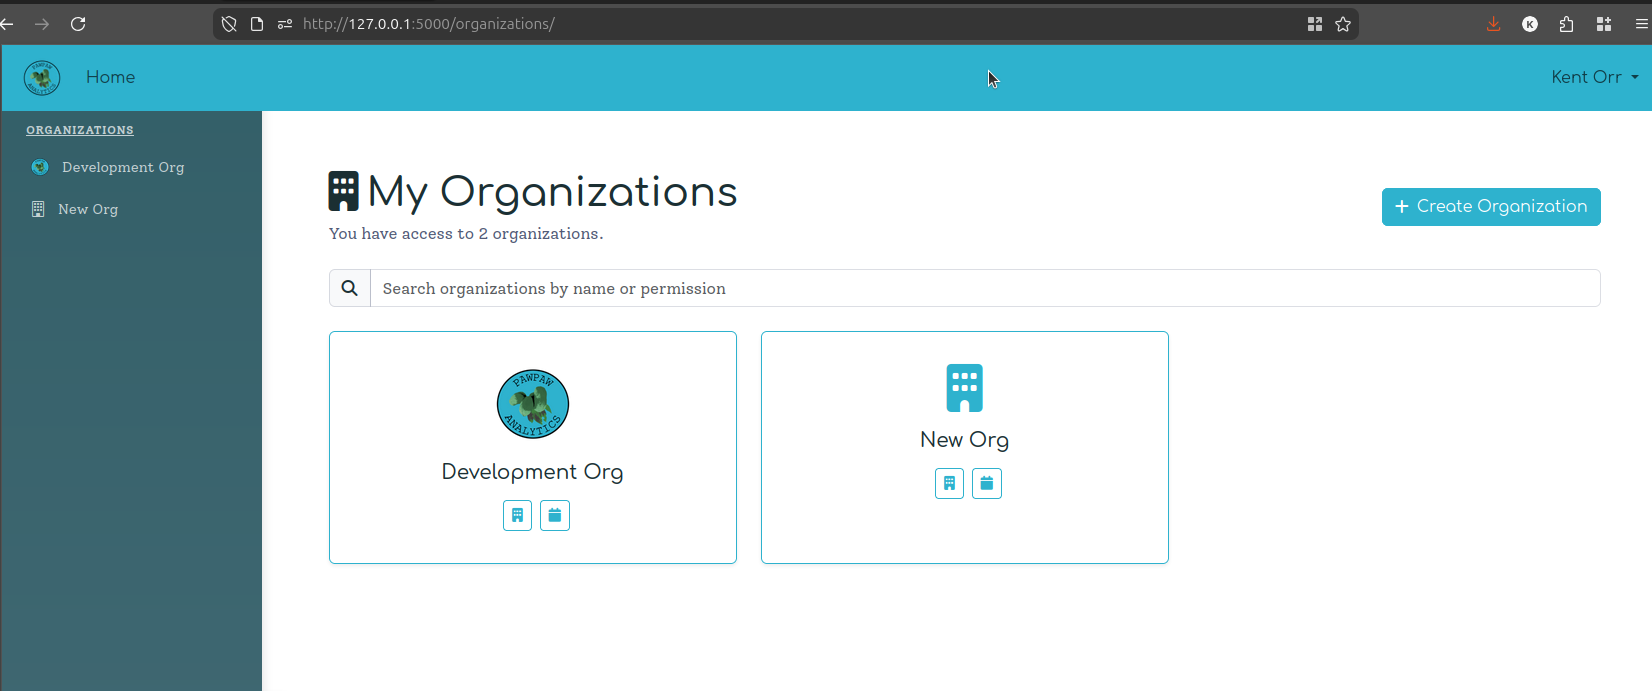
My Organizations
When you first log in to Pawpaw Analytics, you land on the My Organizations page — your home base for everything on the platform. This is the list of all the organizations you're a member of, and it's where you go to navigate between them or create a new one.
Most Users Have One
For the majority of Pawpaw users — a festival organizer, a nonprofit, a community event crew — you'll only ever see one card on this page: your organization. That's completely normal. You'll click straight through to it every time you log in, and the page mostly just serves as a clean entryway.
That said, the platform is built to handle more.
Why this way We designed Pawpaw to work equally well for a single-event organization and for contractors, agencies, or enterprise customers who manage multiple client organizations. Each organization has its own billing, its own events, and its own permissions — so a consultant who runs volunteer coordination for three different festivals can manage all three from one Pawpaw account, without their clients' data ever mixing.
Managing Multiple Organizations
If you're a contractor, agency, or enterprise operator, you may have two or more organization tiles on this page. Each card links to a fully independent workspace:
- Its own events, instances, and sub-applications (Hands Up, ItCounts)
- Its own billing and subscription tier
- Its own member roster and permissions
Switching between organizations is as simple as coming back to this page and clicking a different card. The left-hand sidebar also lists all your organizations for quick navigation without returning to this page.
Searching Your Organizations
Above the cards is a search bar. Start typing and the tiles filter in real time. You can search by:
- Name — type any part of the organization's name
- Permission — type a permission keyword (e.g., "billing" or "events") to surface organizations where your membership includes that permission
This is most useful if you're a platform admin or contractor managing a large number of organizations — finding the right one by memory alone gets tedious fast.
Organization Cards
Each card shows:
- The organization's logo (if one has been uploaded) or a default building icon
- The organization's name
- Two quick-action buttons: one to jump to the organization detail page and one to jump directly to Events
Click anywhere on the card to go to the organization's main page.
Creating a New Organization
Click + Create Organization in the top-right corner to launch the organization creation wizard. The wizard walks you through naming your organization, setting up your first event, and activating the apps you want to use — all in one guided flow.
Tip If you're a contractor setting up a new client, create a new organization for them rather than adding their events under your own organization. Keeping client workspaces separate ensures their billing, data, and team permissions stay cleanly isolated.
Organization Settings
Click through to any organization from the My Organizations page and you land on the Organization Settings page — your control panel for everything that's shared across all your events. This is where you handle branding, manage your team, connect POS systems, and take care of billing.
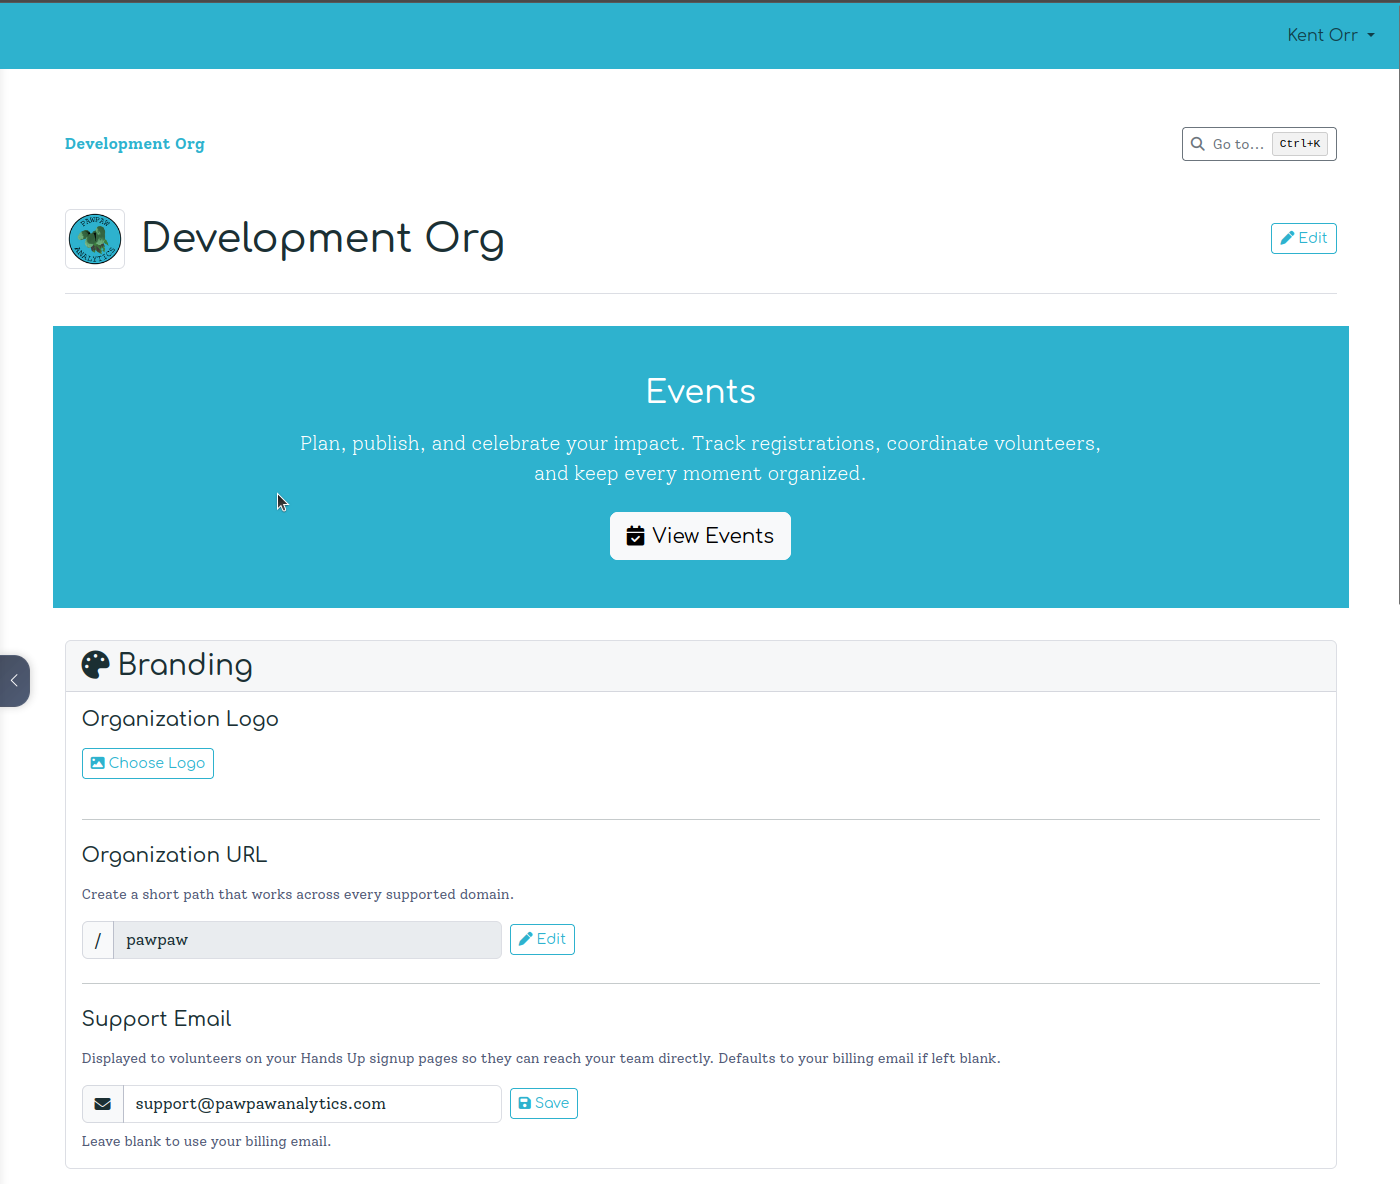
At the very top of the page, your organization's logo and name are displayed together. If you have the right permissions, click Edit to rename the organization in place — the title turns into an inline text field, and a checkmark saves the change immediately.
Branding
The Branding card is where you shape how your organization appears across the platform — and to your volunteers.
Upload a PNG, JPG, or SVG (up to 50 KB) and it appears in the header here, on the My Organizations page tile, and anywhere else the platform displays your organization. Click Choose Logo to pick a file from your computer. A preview appears before you save; click Save to commit it, or Remove to go back to the default icon.
Why this way Logo branding is a paid-plan feature. On the Free tier, the logo controls are replaced with an upgrade prompt. This keeps the free tier genuinely useful for getting started while reserving visual customization for organizations investing in the full experience.
Every organization gets a short "vanity slug" — a custom path like /pawpaw — that works across every supported domain on the platform. This short URL is used in public-facing links such as volunteer signup pages, making it easy for you to share a memorable address instead of a long ID-based URL.
To change it, click Edit next to the current URL. Because changing your organization URL will break any existing bookmarks or links, the platform asks you to type the new URL a second time in a confirmation modal before saving. Take this step carefully — there's no automatic redirect from the old slug.
Tip
Keep your URL short and recognizable — something like your organization name or abbreviation. pawpaw, stuartsopera, nelsonvillemusic are all good candidates.
This is the contact address shown to volunteers on your Hands Up signup pages. If someone has a question while registering, they'll see this address and know who to reach. Leave it blank and it defaults to your billing email. Setting a dedicated address (like [email protected]) keeps your volunteers pointed to the right inbox.
Memberships
The Memberships card links out to the full Memberships page, where you manage who has access to your organization and what they can do.
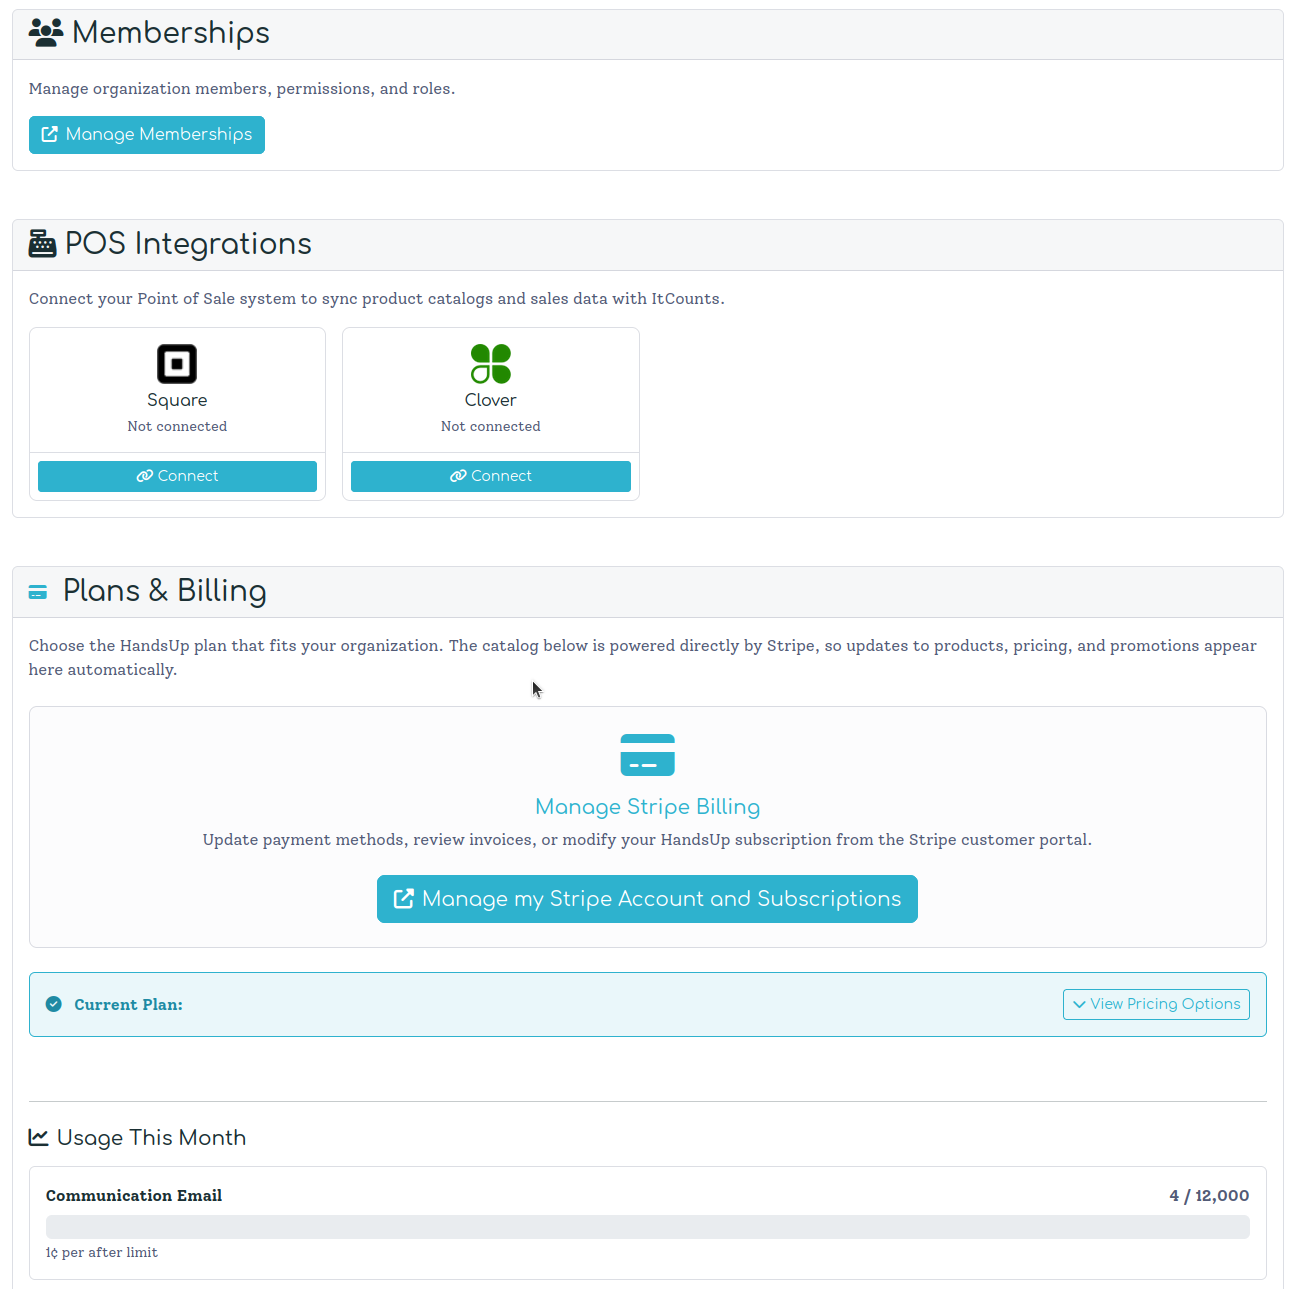
Click Manage Memberships to get there. On that page, you can:
- Add a member by email — if they already have a Pawpaw account, they're added immediately; if not, an invitation is sent.
- Set a permission level when adding: Admin, Member, or Read Only.
- Admin — full access including billing and user management - Member — can view and create resources (events, locations, shifts, etc.) - Read Only — view-only access to events, volunteers, and inventory
- Edit or remove existing members from the table.
- Generate API Keys for automated integrations (if your plan and permissions allow it).
Why this way We keep memberships separate from organization settings rather than cramming everything onto one page. Membership management can involve many rows, edit actions, and invitations — it deserves its own focused space. The organization detail page just gives you a quick link to get there.
POS Integrations
If your event uses Square or Clover as a point-of-sale system, connect it here. The POS Integrations section shows one tile per supported provider. Each tile displays the current connection status and a Connect button.
Clicking Connect starts the OAuth flow — you'll be redirected to your provider's consent screen to authorize Pawpaw to access your merchant account. Once connected, the tile shows your Merchant ID and the date the connection was made. A Disconnect button appears in place of Connect; clicking it walks you through a confirmation modal that explains exactly what will (and won't) be removed.
What disconnecting does NOT do Your existing products and transaction data in ItCounts are not deleted when you disconnect a POS integration. You're just revoking the live access token; your historical data stays in place.
For a full walkthrough of what you can do once a POS is connected — importing product catalogs, mapping locations, and syncing sales — see the Square and Clover integration sections in the ItCounts documentation.
Plans & Billing
The Plans & Billing section is where you manage your Pawpaw subscription. It's visible to members with billing permissions.
Current Plan — Once your organization has an active subscription, an info bar at the top of the section shows your current plan tier. Click View Pricing Options to expand the full pricing table inline, making it easy to compare your current plan against other tiers without leaving the page.
Manage Stripe Billing — Click Manage my Stripe Account and Subscriptions to open the Stripe customer portal in a new tab. From there you can update payment methods, review past invoices, and change or cancel your subscription. The portal is hosted directly by Stripe, so your card details and billing history are handled with full Stripe-grade security.
Usage This Month — Below the billing portal link is a usage dashboard that shows how much of each metered resource you've consumed this billing period. For example, if your plan includes 12,000 communication emails per month and you've sent 4, you'll see "4 / 12,000" with a progress bar. Overage pricing is shown for each item so there are no billing surprises.
Why this way Pricing is served live from Stripe — not hardcoded in the application. That means when we update a plan's price, add a tier, or run a promotion, the pricing table here updates automatically. You always see the real, current pricing, not a stale screenshot.
How Events Are Organized
Before we dive into any specific feature, let's talk about how Pawpaw organizes things. This structure is the backbone of everything else.
Organization → Event → Event Date
Think of it like nesting dolls:
- Organization — The group that puts on the events. This is your top-level workspace.
- Event — The recurring thing you do. "Nelsonville Music Festival," "Summer Concert Series," "Annual Charity Run."
- Event Date — A specific occurrence of that event. "2026," "Fall 2026," "Spring Session."
Let's make it concrete. Stuarts Opera House is an organization. They put on the Nelsonville Music Festival, which happens once a year. So in 2026, the Event Date is simply "2026." Next year, they'd add "2027."

Why this way By keeping this hierarchy, we preserve everything — settings, analytics, volunteer history — across every recurrence of your event. You don't start from scratch each year. You carry knowledge forward. And when it's time to set up next year? All your locations, shifts, forms, and rules can be copied into a new Event Date with the click of a button.
A few things to know about Event Dates:
- Timezone is set at the Event Date level, so multi-timezone organizations can handle each occurrence correctly.
- Copying works across Event Dates within the same Event — your shifts, forms, and rules all come along for the ride.
The Operations Dashboard
When you open an Event Date, you land on its Operations Dashboard — a 2×2 layout that groups the tools you'll reach for most often:
- Operations Dashboard — the in-page heading that takes you to the Coverage page (fill rates, schedules, rosters, and activity all in one place).
- Volunteers — the member directory for this Event Date.
- Communication — the Communication Center for sending emails to your crew.
- Event Setup — a grouped card that holds Form, Locations, and Shift Setup for configuring the event before you open signups.
Why this way The four-card layout separates setup mode (Event Setup) from operations mode (the other three cards). It mirrors how organizers actually think about an event: first you configure, then you run.
Hands Up Volunteer — The Big Picture
We think of the volunteer signup flow in three parts:
- Registration Form — Collect the information you need from volunteers
- Shift Selection — Let volunteers pick when and where they want to help
- Communication — Keep in touch before, during, and after the event
Each of these is deeply configurable based on your subscription level, but even the free tier gives you a solid foundation to work with.
Registration Forms
The registration form is the first thing your volunteers see. It can be as simple or as detailed as you need:
- Free tier gives you a preset form with basic contact info gathering — name, email, phone.
- Higher tiers unlock custom colors, fonts, question types, waivers, confirmations, and more.
Forms aren't just for collecting info — they can enforce requirements. Need a signed waiver? A dietary restriction survey? An age confirmation? The form handles it.
Shift Selection
After a volunteer submits their registration form, they move on to shift selection. This is where the real magic happens, and we've put a lot of thought into making it flexible.
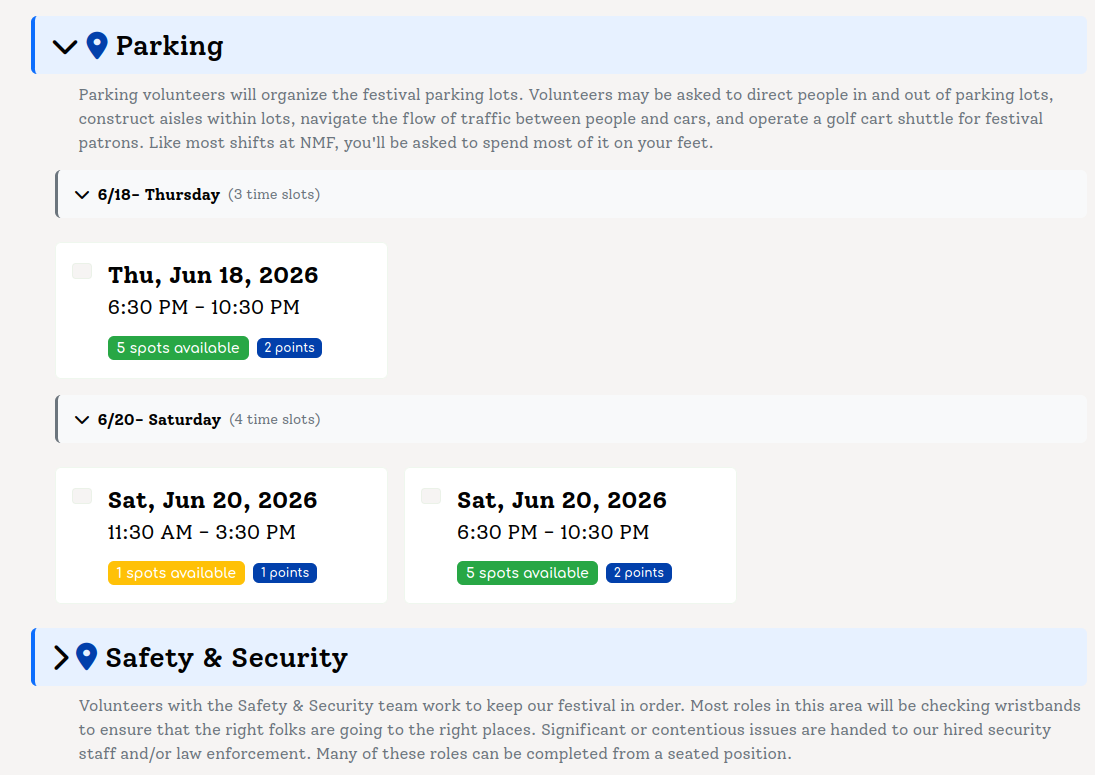
Shifts are grouped by Locations — think of locations as areas of work or duty groups. A typical setup might look like:
- Parking — Parking Attendant shifts
- Guest Check-In — Front gate shifts
- Concessions — Food and drink shifts
- Main Stage — Setup and teardown shifts
Why Locations Grouping shifts by location isn't just organizational — it unlocks a tiered rules system. You can set rules at the Event Date level, override them at the Location level, and fine-tune them at the Shift level. More on that in The Rules System.
Communication Overview
Once volunteers are signed up, you need to stay in touch. Hands Up provides tools for email communication, letting you send updates, reminders, and thank-you notes to your volunteer crew. Communication features scale with your subscription tier.
Coverage
The Coverage page is mission control for running a live event. Where Shift Setup is about building the schedule and Volunteers is about managing people, Coverage is about watching the event happen in real time — who's signed up, where the gaps are, which locations are at risk, and what needs attention right now.
You'll find it on the event date index under Operations Dashboard → Coverage. It lives at /handsup/<instance>/coverage.
Fill Rate and KPI Cards
The top of the page is a row of at-a-glance KPI cards: total volunteers, total shifts, overall fill rate, and unassigned shift count. These numbers update every time you reload and give you the one-screen answer to "how are we doing?"
Below the KPIs is the Fill Rate by Location horizontal bar chart. Each bar is one location, sorted so the locations that need the most help float to the top. Hover a bar to see exact counts — "12 of 18 shifts filled (67%)" — and click it to drill into that location's Coverage view.
Tip Fill rate is computed as assigned shifts divided by total shifts, not by volunteer hours. A single unfilled shift drops your number more on a small location than a large one, which is usually what you want — small locations are the ones where a gap actually hurts.
Location-Level Coverage
Click into any location and you get a focused view of just that location's shifts. At the top is a banner with the location name, an overall fill gauge, and a Send Email button that opens the reusable email composer modal pre-scoped to just the volunteers in that location. Below that is the schedule calendar:
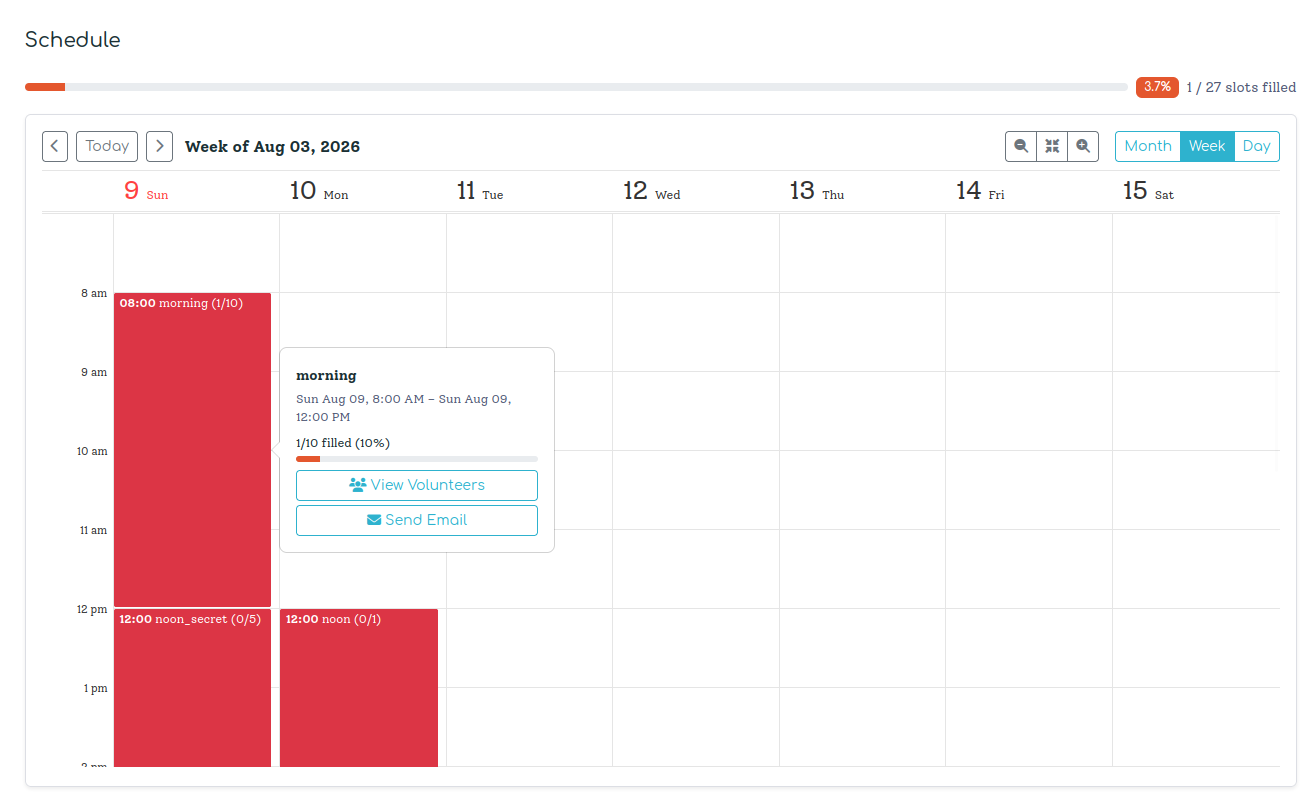
Schedule Calendar — A week/day calendar laid out exactly like the Shift Setup page, but where Shift Setup shows shifts for editing, Coverage shows them for monitoring. Each cell is color-coded by fill percentage (red for empty, yellow for partial, green for full) and displays the ratio — "3/5" — so you can see the entire coverage picture at a glance. Click any shift to jump into its detail page.
See also When you need to hand this data to someone without a platform login — a printable sign-up sheet, a CSV for payroll, a shared Google Sheet — head to the Exports page. It's the next item in the Operations sidebar.
Why this way Coverage consolidates fill rates, rosters, and the activity feed in one place so coordinators have a single screen to check during event weekend — no tab switching between "who's on the schedule" and "what just changed."
Volunteers
Once your registration form is live and your shifts are set up, volunteers start joining. This is where you see who's signed up, manage their shift assignments, review their survey responses, and keep track of what's happening across your crew.
You'll find the Volunteers section in the left-hand navigation of your Hands Up instance, alongside Shift Setup, Coverage, and Communication.
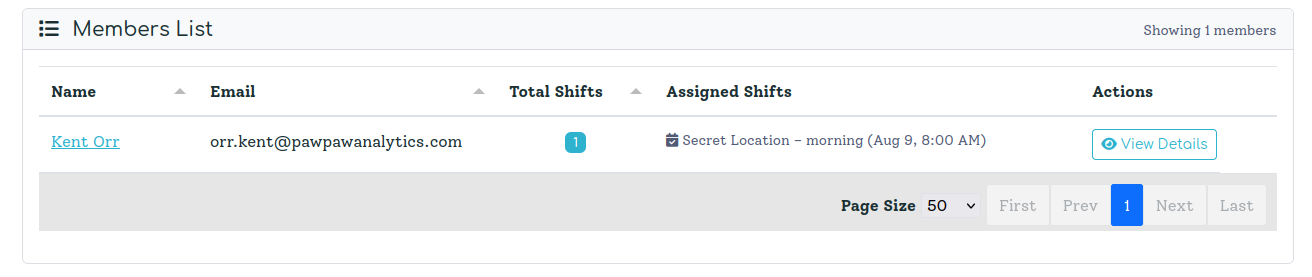
The Volunteers List
The volunteers list is your live dashboard of everyone who has registered for your event. Each row shows a volunteer's name and email, how many shifts they've taken, and a preview of those shifts — location, name, and time. Click any row to open the volunteer's detail page.
At the top of the list you'll see the total volunteer count. Below the table, any pending invitations (people you've invited who haven't signed up yet) appear as a separate list with a "Cancel invitation" option.
Filtering and search are built right in. The toolbar above the table gives you:
- Search — Type any part of a name, email, or survey response text. Results filter in real time as you type.
- Location filter — Narrow to volunteers assigned to shifts within a specific location.
- Shift filter — Narrow to volunteers on one particular shift.
- 0 Shifts — A quick toggle to show only volunteers who have registered but haven't signed up for any shifts yet. Useful for follow-up communication before your event.
Active filters appear as dismissible badges below the toolbar, so it's always clear what's being applied. Hit the × on any badge to remove that filter individually, or use Clear All to reset.
Why this way We designed the list for the moments when you need answers quickly — "how many people are working the Parking location?" or "who signed up but hasn't picked a shift yet?" The filter system is meant to answer those questions in two clicks rather than requiring you to run a report.
Adding Volunteers
You can add volunteers two ways: they can find your registration link and sign up themselves, or you can add them manually from the Volunteers page.
Click Add Volunteer to open the add modal. Enter an email address and Pawpaw checks what to do:
- If the person already has a Pawpaw account, they're added to your event instantly and receive a "You've been added as a volunteer" email.
- If the email isn't in the system yet, a pending invitation is created and they receive a signup link. Once they complete registration, they appear in your volunteer list automatically and the invitation disappears.
Either way, you'll see the result immediately — either a new row in the volunteers table, or a new entry in the pending invitations list.
Tip Pending invitations are a great way to pre-load your crew list before your public registration opens. Add your regular returning volunteers by email, and they'll be ready to pick shifts the moment the form goes live.
Volunteer Detail Page
Click any volunteer in the list to open their detail page. This is the full picture for that one person.
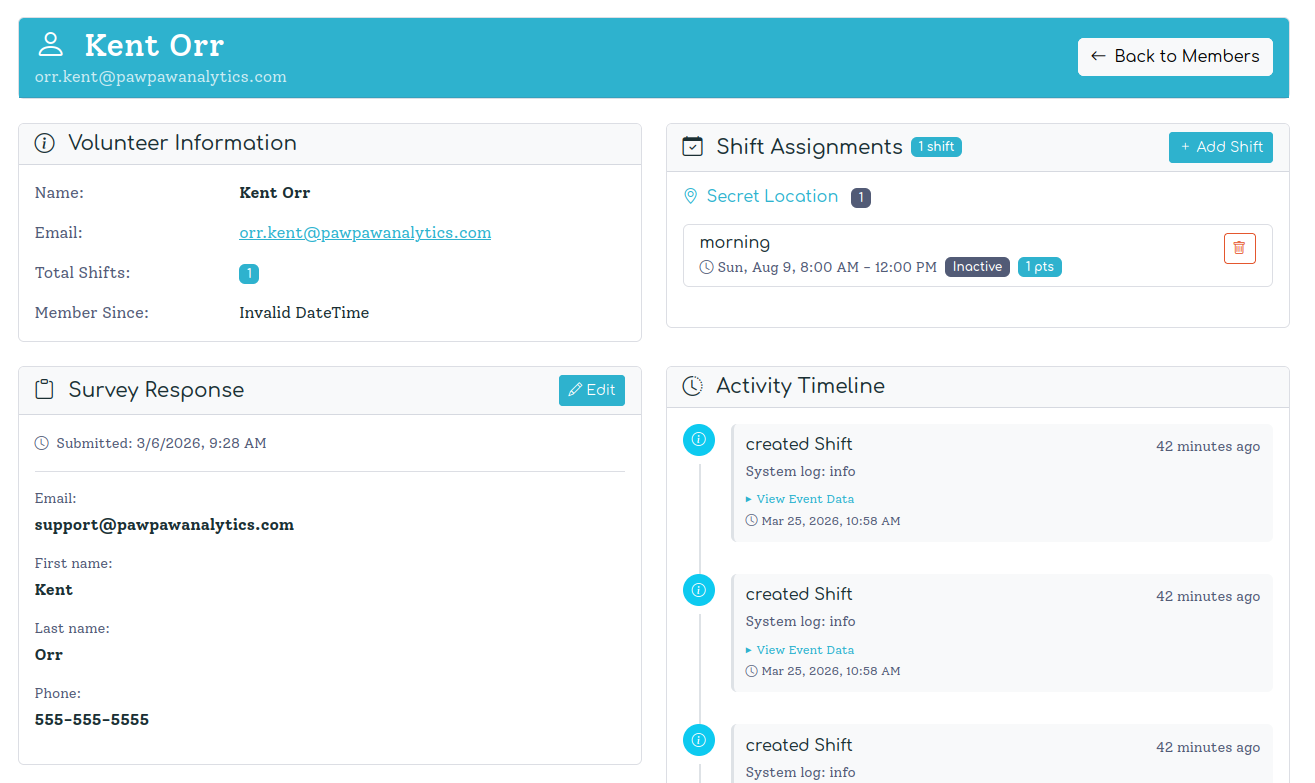
The page is organized into four cards:
Volunteer Information — Name, email, total shift count, and the date they joined as a volunteer. Simple, but it's the quick reference card you'll use constantly.
Shift Assignments — All the shifts this volunteer has taken, grouped by location. Each shift shows the name, time range, description, and point value. You can add a shift directly from this card — useful when a volunteer asks to be added to something manually, or when you need to make an assignment that bypasses the normal signup flow. You can also remove individual shifts with the trash icon next to each one.
Why this way Organizers often need to make manual adjustments after the public signup window closes. A volunteer might message you to swap shifts, or you might need to move someone to a location that's already full. The detail page gives you the override controls to do that without touching the public-facing signup rules.
Survey Response — The volunteer's answers from your registration form. If they submitted a response, you'll see all their answers laid out with question labels and formatted values. If you need to correct something (a typo, a changed dietary requirement, an updated phone number), click Edit Response to modify any field and save.
Activity Timeline — A reverse-chronological log of everything that's happened for this volunteer in your event: when they joined, when they submitted their survey, each shift assignment. System log entries for any warnings or errors appear here too. The timeline is paginated at 10 entries per page, so you can scroll back through the full history of a volunteer's relationship with your event.
Inferred Names
Some volunteers sign up through an identity provider (Google, Apple, etc.) that shares their email address but not their display name. When that happens, Pawpaw stores their email as their name — or stores nothing at all — making the Volunteers list hard to scan and printouts awkward to hand out.
To fix this, Pawpaw can infer a name from the volunteer's email address and any survey responses they submitted, using an AI model. An inferred name appears everywhere a name would — the volunteers list, the volunteer detail page, printable rosters, CSV exports, and the activity feed — but it is always marked with a trailing asterisk (*) so you know it was suggested by AI, not confirmed by the volunteer.
For example, if a volunteer registered as [email protected] and the AI inferred their name as Jane Doe, every name field shows Jane Doe* in the platform.
Triggering Inference
Single volunteer — Open the volunteer's detail page. If the name is missing or is just the email address, an Infer Name button appears in the Volunteer Information card. Click it to run inference immediately (~2 seconds). The name updates on screen as soon as it completes.
Bulk inference — From the Volunteers list, click the Infer Names button in the page header (visible when name inference is enabled on your plan). This submits all eligible volunteers to an AI batch process, which runs in the background and may take up to 24 hours. Use the status button to check progress and collect results when the batch finishes.

When Names Stay Marked With *
The asterisk remains until the volunteer logs in and sets a real display name on their account. It is a reminder that the name is a best guess — accurate in most cases, but for anything sensitive (signing documents, printing credentials) you may want to confirm it with the volunteer directly.
Name inference is a Starter tier feature and above. On the Free tier the Infer Name button and bulk controls are not shown.
Removing a Volunteer
At the bottom of every volunteer's detail page is a Danger Zone with a "Remove Volunteer" button. Removing a volunteer permanently deletes their shift assignments, survey response, and instance membership. A confirmation modal spells this out before you commit.
Communication
Once your volunteers are signed up and their shifts are locked in, the real work of keeping everyone informed begins. The Communication Center is where you send emails to your volunteer crew — whether that's a pre-event briefing to everyone, last-minute instructions to the team working the main stage, or a quick note to a specific volunteer about their assignment.
You'll find the Communication Center as a dedicated card on the Operations Dashboard, and as an item in the left-hand sidebar alongside Volunteers, Shift Setup, and Coverage. And because the same composer is reusable, you'll also see Send Email buttons sprinkled across the platform — on the Coverage page's active-location banner, on a volunteer's detail page, and on a shift's detail page. Clicking one of those opens the composer as a modal right where you are, with the recipients pre-selected for that context. It's the same tool either way; the dedicated page is just the "from scratch" entry point.
Who Can Use the Communication Center?
Email communications are a Starter tier feature and above. On the Free tier, you'll see the Communication Center in the navigation but the compose form will be locked. If you're the billing admin for your organization, you'll see an "Upgrade Plan" link directly on the locked page.
Higher tiers unlock the ability to send to larger audiences and include higher monthly email volume allowances — so as your event grows, your plan scales with it.
Why this way We distinguish between transactional emails (signup confirmations, invitations) and communication emails (your custom messages to volunteers) for a good reason. Transactional emails are infrastructure — volunteers expect them regardless of plan. Communication emails are a value-added feature: crafting and sending custom messages to your crew reflects a more managed event operation. Keeping them separate means the free tier stays genuinely useful while paid tiers get the full communication toolkit.
Choosing Your Recipients
The "Send To" section is the first thing you configure. You have four options:
- All Volunteers — Everyone with at least one shift assignment in this event. This is your go-to for event-wide announcements: "Gates open at 10am, please arrive 30 minutes early."
- By Location — All volunteers assigned to shifts within a specific location. Perfect for targeted briefings: send parking instructions only to the Parking location team.
- By Shift — All volunteers on a specific shift. Use this for precise communication: "The 8am–12pm Main Stage Setup crew: please bring your own work gloves."
- Individual — A single volunteer, searched by name or email. Useful for personal follow-ups or one-off logistics coordination.
When you select "By Location" or "By Shift," a dropdown appears populated with all your event's locations and shifts. When you select "Individual," a live search box lets you find a volunteer by name or email — matching results appear as you type.
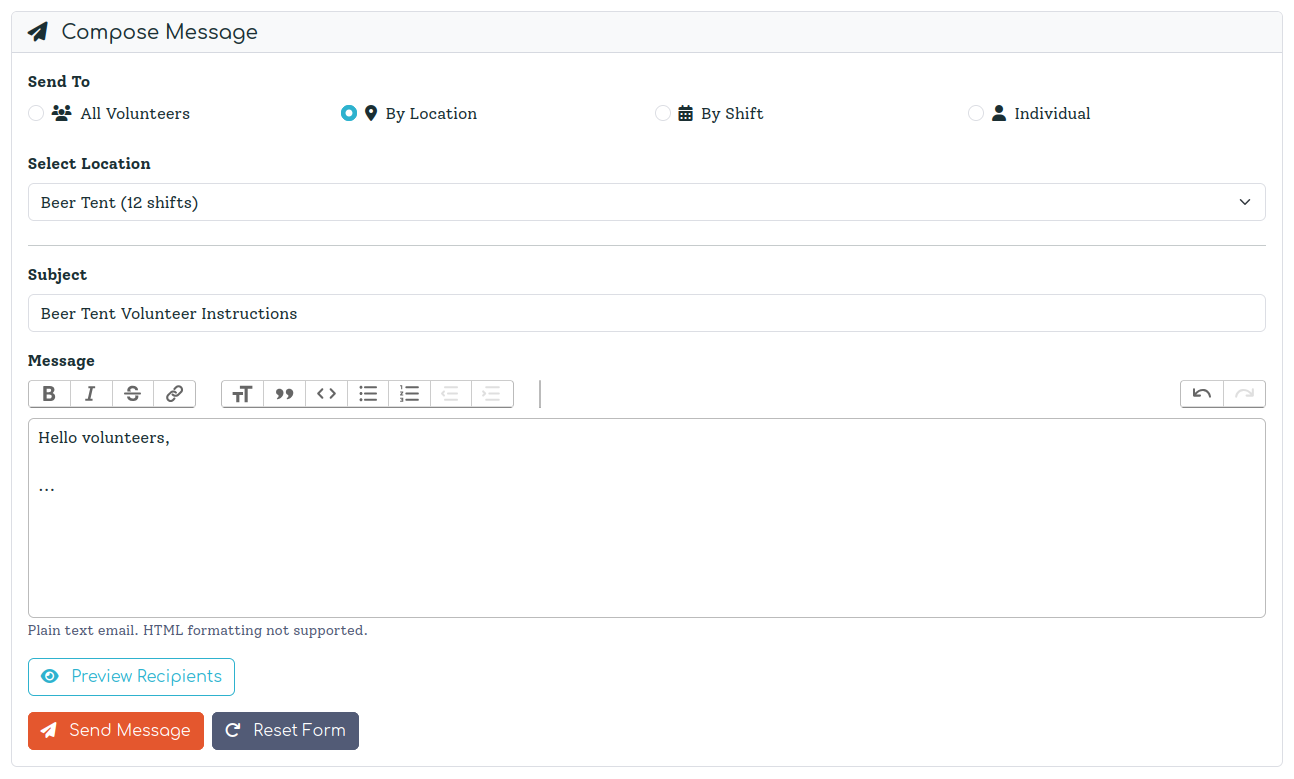
Before you write a single word, it's worth clicking Preview Recipients. This shows you exactly who will receive the email — names, email addresses, and shift counts. The preview shows the first 10 recipients with a count of additional recipients beyond that.
Composing & Sending
The composition form has two fields: Subject and Message.
The message editor uses Trix, a lightweight rich-text editor. You can apply basic formatting — bold, italic, lists, links — and the output is sanitized HTML that renders cleanly in email clients. File attachments are not supported.
The email your volunteers receive is delivered through SendGrid using a clean, responsive template that shows your event name prominently in the header and your message in the body. Every communication email includes an unsubscribe link at the bottom. If a volunteer opts out, they won't receive future communications emails from your event — though they will still receive essential transactional emails (like signup confirmations).
Why this way We include an unsubscribe link on every communication email — not just because email law in most jurisdictions requires it, but because we think it builds trust. A volunteer who knows they can opt out is more likely to stay engaged. And if someone does unsubscribe, we honor that immediately and permanently for that event.
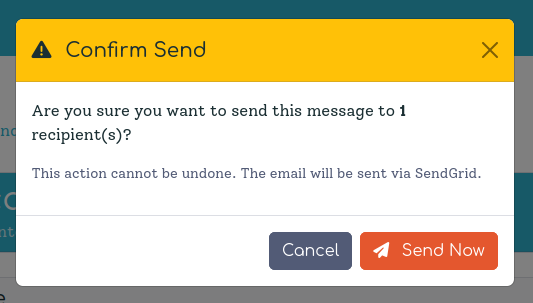
Once your recipient group is set and your message is composed, clicking Send Message opens a confirmation dialog showing the recipient count one more time. Confirm, and the emails go out. Emails go out quickly — the platform sends concurrently so even a large crew gets their messages in seconds rather than minutes. Your plan's monthly volume limit applies to communication emails; the count shown in the confirmation dialog is what will be deducted from your allowance. After a successful send, you'll see a confirmation banner showing how many emails were delivered.
Transactional Emails
Beyond the Communication Center, Hands Up sends a handful of transactional emails automatically:
- Signup Complete — Sent to a volunteer when they finish registration and shift selection
- Admin Notification — Sent to your team when a new volunteer signs up
- Member Added — Sent when a volunteer is added to your roster directly by an organizer
- Volunteer Invitation — Sent when you invite someone to join as a volunteer
These use dedicated, pre-built templates and are sent via the same SendGrid infrastructure. They're available on all subscription tiers, including Free.
Tier Summary
| Feature | Free | Starter | Basic | Pro |
|---|---|---|---|---|
| Transactional emails (signup, invitations) | ✓ | ✓ | ✓ | ✓ |
| Communication Center (custom emails to volunteers) | — | ✓ | ✓ | ✓ |
| Send to All / By Location / By Shift / Individual | — | ✓ | ✓ | ✓ |
| Recipient preview | — | ✓ | ✓ | ✓ |
| Unsubscribe management | — | ✓ | ✓ | ✓ |
Exports
The Exports page is where you pull your event's volunteer and shift data out of the platform for sharing, printing, or downstream processing. It's a top-level item under Operations in the Hands Up sidebar, right after Communication.
See also Exports and Coverage work on the same underlying data — Coverage is for monitoring live, Exports is for handing off.

You can grab the roster as a CSV, a printable shift sign-up sheet, or push the whole coverage report to a Google Sheet for sharing with coordinators who don't have platform logins. The Google Sheets option uses your organization's connected Google account (configured in Organization Settings); CSVs work everywhere.
Note Volunteer names marked with an asterisk (*) in any export — CSVs, printable sign-in sheets, and contact sheets — were inferred by AI from the volunteer's email address because they haven't provided a display name. See Inferred Names for details.
Signup Flow
The Signup Flow page is where you control what volunteers can and cannot do once they reach your event. You'll find it under Event Setup → Signup Flow on the event date index.
Think of Shift Setup as answering "what shifts exist?" and Signup Flow as answering "who gets to see them, and what can they change?"
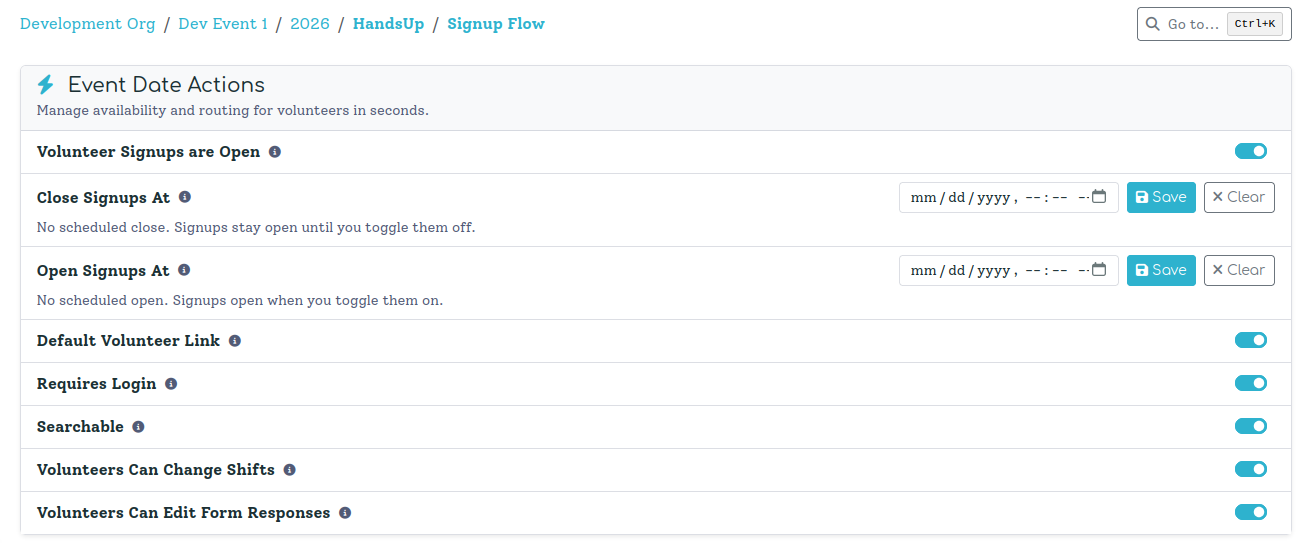
The Event Date Actions Card
All of the toggles on this page live in a single card called Event Date Actions. Each one is a simple on/off switch that takes effect immediately — there's no Save button for the toggles themselves, just flip it and the new behavior is live for every volunteer that visits your signup page.
Volunteer Signups are Open — The master switch. The toggle answers whether this statement is currently true. When it's off, your public signup page goes into a "signups are closed" state — volunteers who already registered can still log in and view their shifts, but nobody new can join. Use this to pause enrollment when you're full or need to freeze the roster before event weekend.
The toggle can also be locked off by a schedule (see below). When a scheduled close or open time is overriding it, the toggle will appear disabled with a tooltip explaining why — change or clear the relevant schedule to regain manual control.
Close Signups At — Set a date and time for signups to close automatically. Once that moment passes, new registrations are blocked exactly as if you had flipped the toggle off — without you having to remember to do it. The status line beneath the picker counts down to the closing time, or confirms when it fired. Clear the field to remove the scheduled close and return to manual control.
Open Signups At — Set a date and time for signups to open automatically. Until that moment, the signup page behaves as if signups are closed even if the toggle is on. Useful when you want to announce an event and set everything up in advance but aren't ready to take registrations yet. The status line counts down to the opening time, or confirms when it fired. Clear the field to remove the scheduled open and return to manual control.
Scheduling tip Close Signups At and Open Signups At work together as a window. Set both to create a registration period that opens and closes without any manual action. The toggle still acts as an override — turning it off closes signups immediately regardless of the schedule.
Default Volunteer Link — When on, anyone who visits your organization's main volunteer URL (e.g., hands-up-volunteer.com/pawpaw) is automatically routed to this event date's signup page. Only one event date can hold this setting at a time — enabling it here disables it on whichever event date previously held it. Use this to point your standing volunteer link at the current year's event without updating every link you've shared.
Requires Login — When on, volunteers must authenticate (via Auth0) before they can see the signup form or pick shifts. When off, anyone with the link can register anonymously. Require login when you need verified contact info and a persistent identity across visits; leave it off for low-friction community events where sign-in would be a barrier.
Searchable — When on, your event shows up in the public event directory and in search results on the Hands Up Volunteer landing page. When off, it only appears to people who have the direct link. Most paid events stay searchable; internal or staff-only events typically turn it off.
Volunteers Can Change Shifts — When on, volunteers can self-serve: they can drop a shift they signed up for and claim a different one, subject to your rules (capacity, conflicts, membership requirements). When off, the shift list becomes read-only from their side — any changes have to go through a coordinator. Leave it on early in planning when you want people to shuffle themselves into the best fit, then switch it off closer to event day once the schedule is locked.
Volunteers Can Edit Form Responses — When on, a volunteer can revisit and update the answers they gave on your registration form (dietary needs, t-shirt size, emergency contact). When off, their original submission is locked and only coordinators can edit it from the Volunteer Detail page. Leave on if you expect details to change; turn off once you've exported data downstream and don't want it drifting.
QR Code Check-In — When on, each volunteer receives a personal QR code for every shift they're signed up for. Volunteers can display their code from their dashboard; authorized staff scan it in a browser to record attendance. This toggle only appears when your plan includes the QR Check-In feature. See QR Code Check-In for the full walkthrough.
Tip If you ever find the public signup page doing something unexpected — volunteers can't find it, they can't change shifts, it's asking for login you didn't want — this is the first page to check. Nine times out of ten, the behavior you're seeing is set by one of these switches or a schedule that fired without you noticing.
The Messaging Card
Below the toggles is a Messaging card where you can write custom text that volunteers see at key moments in the signup flow. Both fields use a rich-text editor so you can apply basic formatting (bold, italic, lists, links).
Shift Signup Message — Appears at the top of the shift selection page, right before volunteers start picking their shifts. Use this to set expectations: parking instructions, what to wear, which location needs the most help, or anything else worth saying before they choose. Leave it blank and the field is hidden entirely — no placeholder message is shown to volunteers.
You can also click Create with AI to generate a message automatically. The AI will draft something appropriate based on your event's name and details — useful as a starting point when you're not sure what to write.
Registration Completion Message — Shown to volunteers immediately after they finish signup, on the confirmation screen. This is a good place for next steps: when to expect their confirmation email, where to park on event day, a link to your volunteer handbook, or simply a warm thank-you. Leave it blank and the platform shows its default "You're all set!" message.
Tip The completion message is one of the most-read pieces of text in the entire volunteer flow — volunteers are engaged and paying attention right after they finish signing up. Don't waste it on a generic confirmation; use it to answer the first question they're about to ask.
QR Code Check-In
QR Code Check-In lets you record volunteer attendance at your event by scanning a unique code — no clipboard, no sign-in sheet, no shouting across a crowded gate. Each volunteer gets their own QR code for each shift they're signed up for, and any authorized staff member can scan it from their phone or laptop to mark them as arrived.
How It Works
For volunteers — Once QR Check-In is enabled for your event, every shift on a volunteer's detail page shows a personal QR code. Each code is unique to that volunteer + shift combination, so there's no mix-up between people or shifts. Volunteers can pull up their page on any device — they don't need to be logged in to display the QR image itself.
For staff — To scan a code, stay logged in to Pawpaw in your browser and point your phone camera at the volunteer's QR code. The camera app recognizes it as a URL and opens it in your browser. If you have the right permission, the volunteer is marked as checked in immediately — you'll see a confirmation page with their name, location, and shift time. No app download required; it's just a standard web page.
What "logged in" means here Scanning requires an active Pawpaw session in the browser doing the scanning — the same session you use to manage volunteers and view shifts day-to-day. If your session has timed out, the check-in page will prompt you to log back in before recording anything. This is how the platform knows who performed the scan and that you belong to the right organization.
Permissions
Two permissions control who can use QR check-in, both found under Check-Ins in your membership settings:
- Check-Ins (Create) — Allows scanning a code and recording a volunteer's first check-in for a shift. This is the base permission; anyone staffing a check-in gate needs it.
- Check-Ins (Update) — Allows scanning a code that has already been checked in, updating the timestamp. Without this, a second scan of an already-checked-in volunteer shows an "already checked in" page rather than recording a new check-in. Grant this to senior coordinators or supervisors who may need to override.
Staff must also belong to the same organization as the event — scanning a code from a different organization's event will be refused even if the URL somehow ends up in the wrong hands.
Why two permissions Separating "create" from "update" means gate volunteers can record first arrivals but can't silently re-check-in someone who was already marked. Override access is intentionally elevated — every check-in (including overrides) is logged with the staff member who performed the scan, so there's always an audit trail.
Enabling QR Check-In
QR Check-In is toggled per event date on the Signup Flow page. Go to Event Setup → Signup Flow and look for QR Code Check-In in the Event Date Actions card. Flip it on and QR codes are generated for every existing shift assignment immediately — volunteers who are already signed up will see their codes right away. New signups receive codes as they register.
The toggle only appears if the QR Check-In feature is included in your plan. If you don't see it, check your subscription tier under Plans & Billing.
Token Expiration
Each QR code is valid until the shift it belongs to ends. Once the shift's end time has passed, scanning the code shows an "expired" page and no check-in is recorded. This prevents codes from being used after the fact. If you need to note a late arrival after the shift window has closed, you can record it manually from the volunteer's detail page.
Registration Form
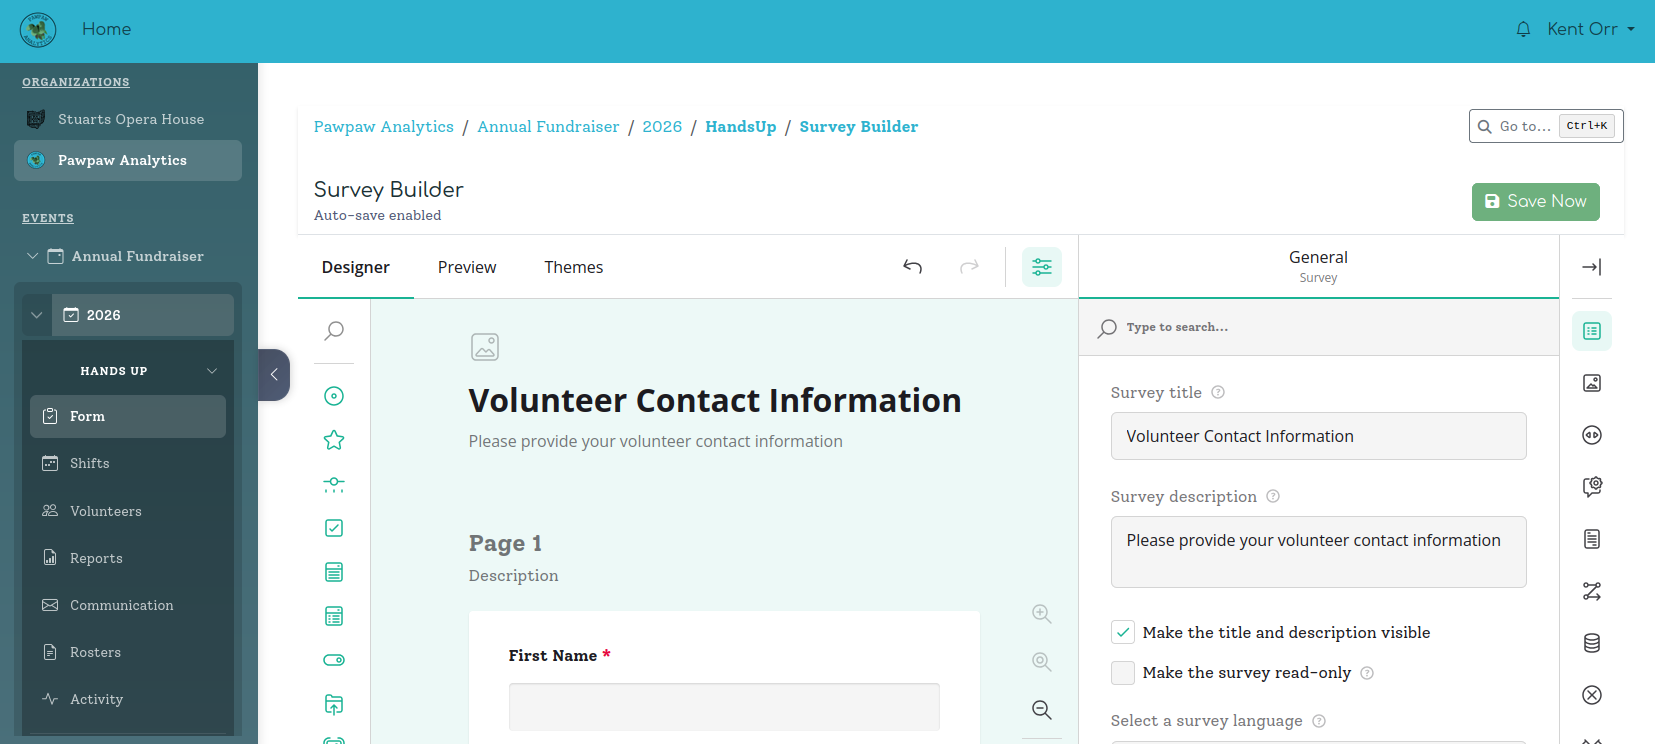
The registration form is the first thing your volunteers see when they sign up. It's powered by SurveyJS, a battle-tested form builder that gives you everything from a simple name/email intake to multi-page forms with conditional logic and custom branding — without needing a developer to touch a thing.
The Default Form
Every event starts with a default form that collects the essentials: first name, last name, email, and phone number. On the Free tier, this form is read-only — it works great out of the box and you don't need to touch it. The form saves its definition with your event date, so you can customize it year to year or copy it forward.
Customizing Your Form (Starter and above)
With a Starter subscription or higher, you unlock the Survey Builder — a drag-and-drop form editor where you can add, remove, and reorder fields. Add a dietary restrictions question, a "how did you hear about us?" dropdown, a required waiver checkbox, or anything else you need to collect.
The builder auto-saves as you work, so you never lose progress. There's also a "Save Now" button if you want to be sure, and a live preview so you can see exactly what volunteers will see before publishing.
Tip Keep forms short and focused. Volunteers are eager to get to shift selection — a 20-question intake form creates friction that leads to drop-off. Collect what you genuinely need; save the optional stuff for a follow-up email.
Question Types
SurveyJS supports a wide range of question types. Here's a taste of what's available:
- Text — Single-line text input (names, short answers)
- Comment — Multi-line text for longer responses
- Checkbox — Multiple-choice, multiple selections allowed
- Radio group — Pick exactly one from a list
- Dropdown — Compact pick-one selector
- Boolean — Simple yes/no toggle (great for waivers: "I agree to the terms")
- Date — Date picker
- Phone number — Phone input with formatting validation (custom to Pawpaw)
- Rating — Star or number scale
- File — File upload field
For the full list of supported question types and options, see the SurveyJS documentation.
Themes & Branding (Basic and above)
The Basic tier unlocks the theme editor. You can customize colors, fonts, border radius, and spacing to match your organization's brand. Stuarts Opera House, for example, might style their form to match the Nelsonville Music Festival's color palette — consistent branding helps volunteers feel they're in the right place from the moment they land on the signup page.
Conditional Logic (Pro)
The Pro tier unlocks conditional logic — the ability to show or hide questions based on a volunteer's previous answers.
Example: Add a question "Do you have food handling certification?" If they answer yes, show a follow-up field for their certification number. If they answer no, skip it entirely. No need to build two separate forms or ask everyone a question that only applies to some.
Why SurveyJS We evaluated a number of form solutions and landed on SurveyJS because it's self-hosted — your volunteer data stays in your database, not a third party's servers. It's deeply customizable, has a proven track record in production, and comes with a full-featured drag-and-drop creator that we've wired directly into your event data. For full documentation on question types, logic, and themes, visit surveyjs.io/documentation.
Tier Summary
| Feature | Free | Starter | Basic | Pro |
|---|---|---|---|---|
| Default form (read-only) | ✓ | ✓ | ✓ | ✓ |
| Add / remove / reorder fields | — | ✓ | ✓ | ✓ |
| Custom thank you page | — | ✓ | ✓ | ✓ |
| Theme & branding editor | — | — | ✓ | ✓ |
| Conditional logic | — | — | — | ✓ |
| JSON editor (advanced) | — | — | — | ✓ |
Locations & Shifts
Shifts are the time slots volunteers sign up for. Every shift lives inside a Location — that's the organizing unit. A Parking location might have five shifts spread across a weekend; a Main Stage location might have a dozen. Before you can create shifts, you'll need at least one location set up.
You'll find this page under Event Setup → Shift Setup on the Operations Dashboard. The name makes it explicit: this is where you configure shifts. Day-of operational views (fill rates, rosters, activity) live on the Coverage page, not here.
There are three ways to create shifts, and each one is the right tool for a different situation.
Method 1: Drawing on the Calendar
When you open a Location's detail page, the default view is a calendar rendered in the event's timezone. To create a shift, just click and drag on any open time slot. When you release, a "Create Shift" modal pops up pre-filled with the exact start and end times you selected. Adjust the name, capacity, and other details, then save. The shift appears on the calendar instantly.
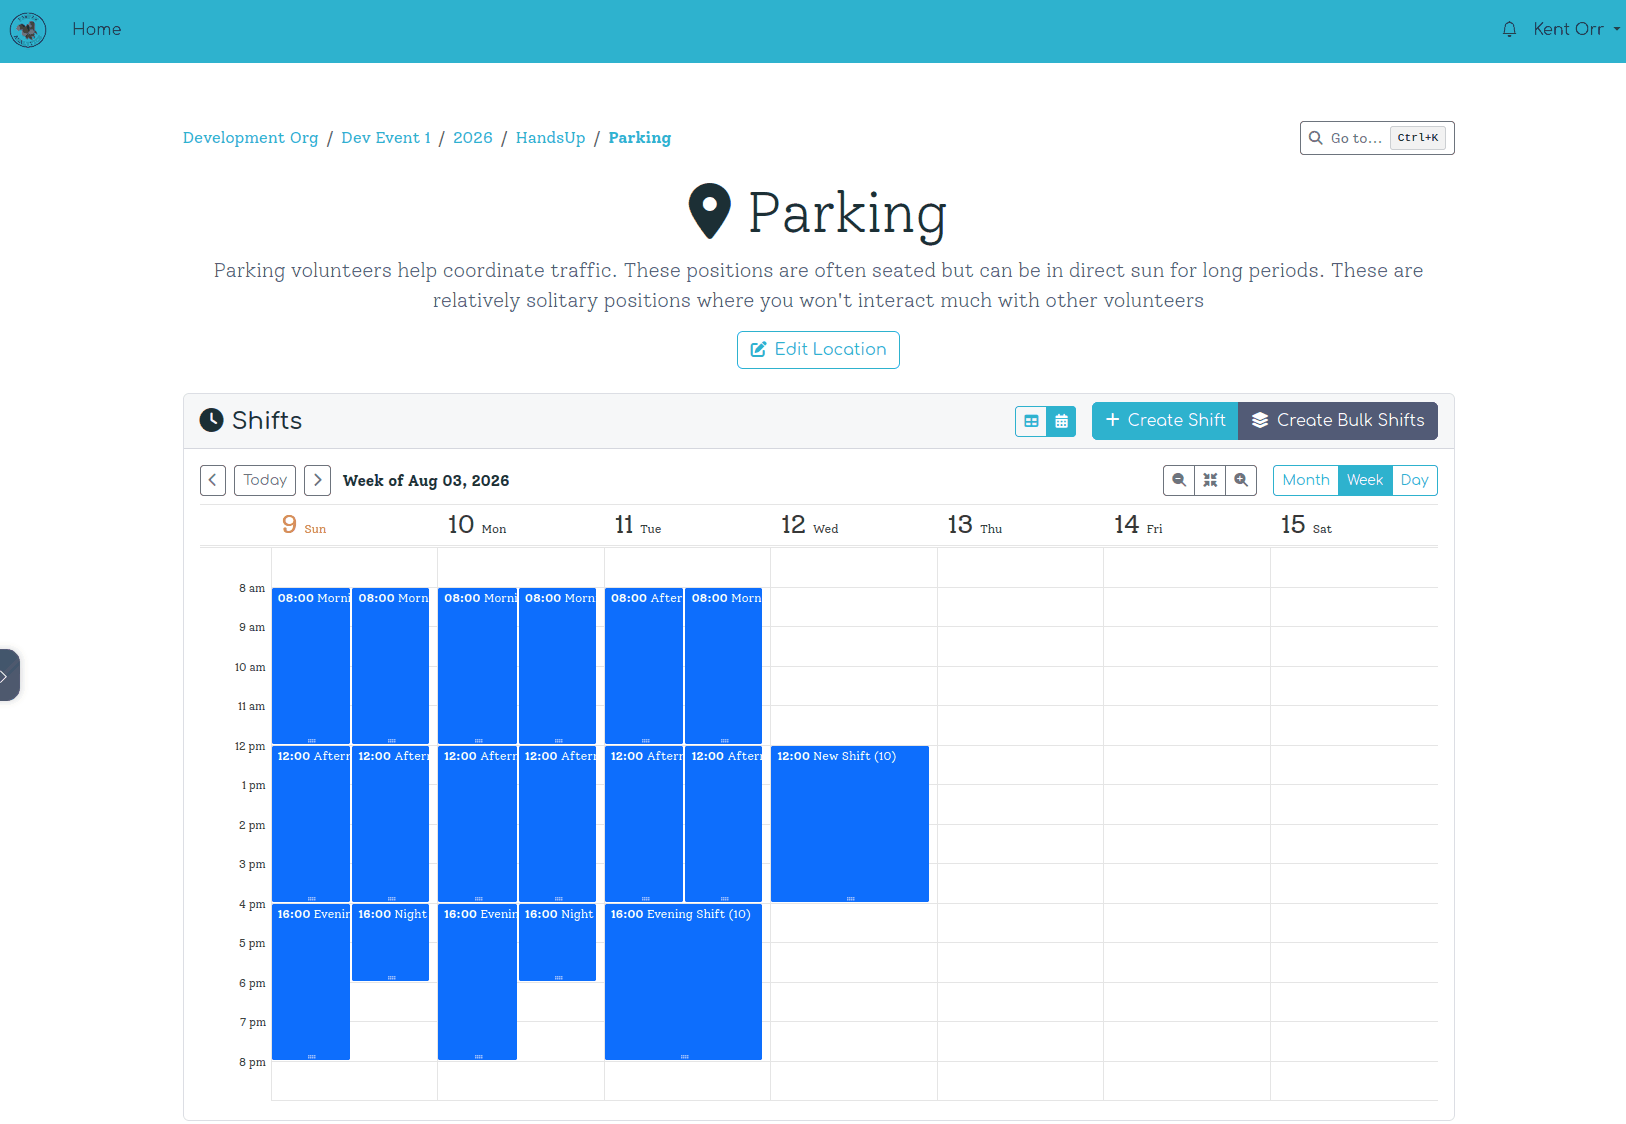
The calendar toolbar lets you switch between Month, Week, and Day views, navigate forward and back, and zoom in or out to show more or fewer hours. Already have shifts? You can drag an existing shift to a new time slot, or drag its edge to resize it — both actions save immediately via the API, no modal required.
Clicking an existing shift opens a popover with a quick summary: name, time, capacity, and point value. From there you can jump to the full shift detail page, open an edit modal, toggle "Accepting Signups" on or off, or delete the shift.
Why this way The calendar drag interface is designed for the moments when you're thinking visually — looking at a week and figuring out where the gaps are. It's much faster than filling in a form from scratch, especially when you're placing a lot of individual shifts across different days.
Method 2: The Create Shift Modal
If you'd rather not draw on the calendar, click the Create Shift button in the Shifts card header. This opens the same modal without pre-filled times. You fill in all the fields manually:
- Name — What volunteers will see (e.g., "Parking Attendant")
- Start Time / End Time — Date and time in the event's timezone
- Capacity — Maximum number of volunteers for this shift
- Points — How many points this shift is worth (default: 1)
- Description — Optional longer description of what the volunteer will be doing
The modal also has an AI Generate button: describe the shift in plain English and the AI will populate the form fields. Useful when you have a mental image but don't want to type out all the details.
Tip Shifts can also be created directly from the Shift Setup index page — the overview for the whole event date, not an individual location. That's the place to go for a bird's-eye view of all shifts across all locations.
Shift-Level Rules
Every individual shift supports two rule overrides that you can set from the shift's detail page:
- Minimum Age — Prevent volunteers below a certain age from signing up for this specific shift, regardless of what the location or event-wide rules say.
- Shift Password — Require volunteers to have a specific password saved in their session to see and join the shift. This is how you create "hidden" shifts for staff, sponsors, or VIP roles.
Why this way The shift-level rules are intentionally minimal — just the two that most commonly need per-shift specificity. Broader constraints (minimum shifts, no-overlap, capacity) are handled at the event or location level where they're easier to maintain consistently.
Method 3: Bulk Shifts Creation
For events with a regular repeating schedule — same shifts every day, or every weekday — typing each one individually would be painful. That's what Bulk Shifts is for.
Click Create Bulk Shifts on any Location page to open the Bulk Shifts tool. The interface is built around Shift Templates — cards where you define a shift pattern once and then select which days it should apply to.
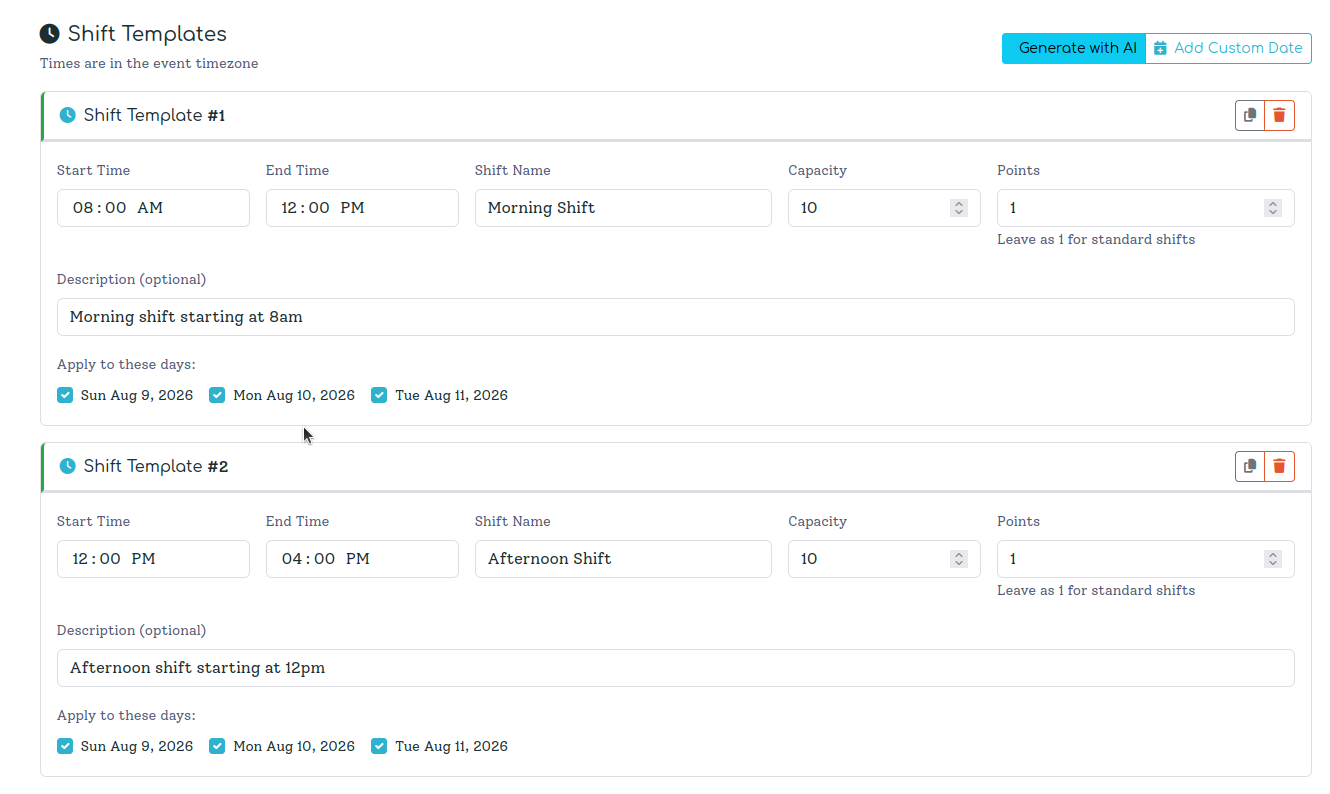
Each template card has:
- Start Time and End Time (in the event's timezone)
- Shift Name, Description, Capacity, and Points
- A row of day checkboxes — one for each day in your event's date range, plus any custom dates you add
Check the days you want, and that template will generate one shift per checked day. Add as many templates as you need — "8am–12pm setup" is one template, "12pm–5pm operations" is another.
Multi-location support is a standout feature. At the top of the page is a Location Selector where you can pick one or multiple locations. When you submit, the platform creates the full matrix: every template × every day × every location.
Example Nelsonville Music Festival has a Main Stage and a Side Stage, both needing the same setup crew schedule. Add both locations to the selector, define your three shift templates with the festival days checked, and hit "Create Shifts." Done — 18 shifts created in one action instead of 18 separate form submissions.
Bulk Rules let you optionally attach a Minimum Age or Shift Password rule to every shift created in this batch. Enable a toggle and it applies to all generated shifts.
Duplicate detection is built in. If you run the same batch twice, the system checks each shift against existing ones in that location. Exact duplicates — same location, start time, end time, name, and description — are skipped automatically and counted as "skipped" in the result summary.
Cross-day shifts work correctly. If your end time is earlier than your start time (e.g., 10pm–2am), the platform detects this and sets the end date to the following day automatically.
AI Bulk Generation
The Bulk Shifts page has a "Generate with AI" button that opens a text prompt. Describe your schedule in plain English:
"Morning shift 8am–12pm for 6 people on all days, afternoon shift 12pm–5pm for 4 people on weekdays only, teardown shift 5pm–8pm on Saturday and Sunday only"
The AI generates template cards pre-filled with the times, names, capacities, and — where possible — the correct day checkboxes pre-selected. Supported date keywords: all, weekdays, weekends, day names (monday, tuesday, …), and specific dates in YYYY-MM-DD format.
Why this way AI generation is designed for the "I have a schedule in my head but not in the system" situation. Typing a sentence is faster than building templates from scratch, and the AI output gives you a starting point to refine rather than a blank form to fill. The AI never creates shifts directly — you always review and confirm before anything is saved.
Adding Custom Dates
The day checkboxes in Bulk Shifts are pre-populated from your event's date range. But sometimes you have a pre-event setup day or a post-event cleanup day that falls outside that range. Click Add Custom Date in the toolbar to pick any date, and it'll appear as a new checkbox on every template card. No need to change the event's dates just to accommodate an edge case.
The Rules System
Rules are how you control who can sign up for what. They're one of the most powerful parts of Hands Up, and they follow a simple principle: the more specific rule wins.
Rule Hierarchy
Rules can be set at three levels:
- Event Date (broadest) — Applies to all locations and shifts
- Location — Applies to all shifts within that location
- Shift (most specific) — Applies only to that individual shift
When rules conflict, the more granular level overrides the broader one.
Example Say you want volunteers to be at least 16 years old at your festival. Set an Event Date rule: Minimum age: 16. But the Concessions stand involves handling alcohol, so you set a Location rule on Concessions: Minimum age: 21. Volunteers under 21 can still sign up for Parking, Main Stage, or any other location — just not Concessions.
Password Protection
Locations and Shifts can be password-protected, which controls visibility. Here's how the hierarchy works:
Say you have a Parking location with a password-protected shift:
- Parking Attendant Shift password:
Secret123 - Parking Location password:
HiddenPhrase456
Anyone who enters Secret123 will be able to see the Parking Attendant shift specifically. Anyone who enters HiddenPhrase456 will see all Parking Location shifts except the ones with their own passwords. This lets you layer access — a general location password for most shifts, with individual shift passwords for special assignments.
Points System
Shifts have a Title, Description, and Point Value. Point values open up clever rule combinations.
Example You want volunteers to work at least 3 shifts, but you also want to make sure at least one of those shifts is an early morning setup shift. Give early morning shifts 2 points and all other shifts 1 point. Set your rules to require 3 shifts and 4 points. Now volunteers must take at least one early morning shift to hit the point threshold — no way around it.
Why points Points are an abstraction that lets you create nuanced requirements without building complex conditional logic. They're simple to understand ("each shift is worth some points, you need X total") but powerful enough to handle sophisticated scheduling needs.
Available Rules
Signup Constraints
- Minimum / Maximum Shifts — Control how many shifts a volunteer must or can take
- Minimum / Maximum Points — Require a minimum point total or cap the maximum
- Minimum / Maximum Locations — Require volunteers to spread across locations or limit them
- Minimum / Maximum Shifts at Location — Fine-tune per-location shift counts
- Minimum / Maximum Total Shift Time — Control total hours committed
Capacity & Access
- Shift Capacity — Maximum volunteers per shift (when it's full, it's full)
- Location Capacity — Maximum volunteers across all shifts at a location
- Shift Active — Enable/disable individual shifts without deleting them
Demographics & Overlap
- Minimum Age — Event-wide age requirement
- Location Age Requirement — Override age requirement per location
- No Time Overlap — Prevent volunteers from signing up for overlapping shifts
- No Time Overlap (Same Location) — Only prevent overlaps within the same location
- No Time Overlap (Different Locations) — Only prevent overlaps across different locations
Access Control
- Shift Password Required — Require a password to view specific shifts
The Command Palette
When you're managing an event across dozens of locations, shifts, and volunteers, jumping between pages can get tedious. The command palette is your shortcut to anywhere — open it, type a few characters, and navigate straight to what you need. No menus, no back-buttons, no hunting.
Opening the Palette
Press ⌘K on Mac or Ctrl+K on Windows/Linux from anywhere in the platform. You'll also find a "Go to…" button in the breadcrumb bar at the top of every page — handy if you prefer clicking.
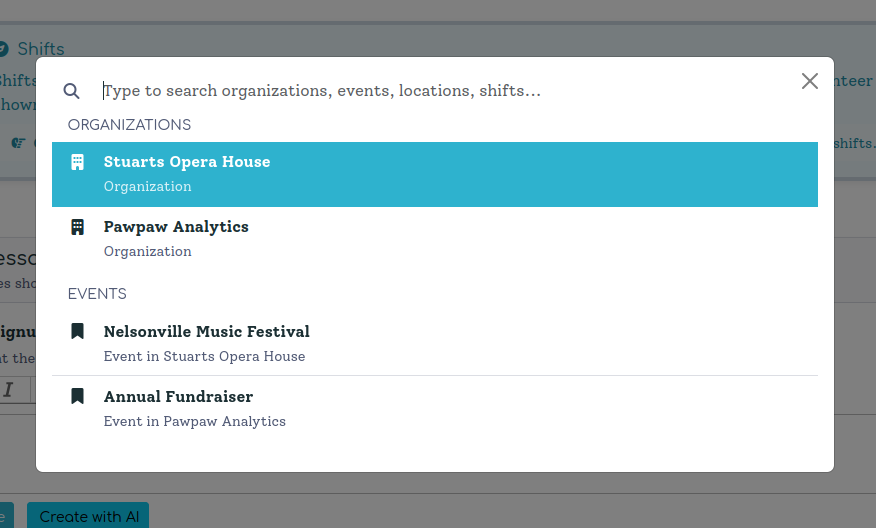
Searching
When you open the palette, it immediately loads your organizations and events. Start typing and it filters that list in real time. Type two or more characters and it runs a deeper server-side search — reaching into event dates, locations, and shifts as well.
The search is case-insensitive and partial-match, so "nels" will find "Nelsonville Music Festival." Matching characters are highlighted in the results so you can see exactly why something surfaced.

Keyboard Navigation
The palette is fully keyboard-driven:
- ↑ / ↓ — move up and down through results
- Enter — navigate to the selected item
- Escape — close the palette
You never have to reach for the mouse.
Quick Actions for Hands Up
When a result is a Hands Up instance (an event date's volunteer management workspace), you'll see quick-action buttons alongside the result row. These let you jump directly to Survey, Shift Setup, Volunteers, or Coverage without navigating through the instance first — a single keystroke from anywhere to the exact tool you need.
Why this way In the thick of event weekend, you don't want to click through four levels of navigation to pull up a shift list. The command palette collapses the hierarchy into a single interaction. We built it as a global shortcut rather than a per-page tool so that the muscle memory — ⌘K, type, Enter — works the same whether you're on the dashboard, deep in rules, or reviewing audit reports.
Tip You don't need to type the full name. Three or four distinctive characters is usually enough. For a festival called "Nelsonville Music Festival," just type "nelso" and you're there.